Camera moves
Note
In older versions of Odyssey, a Camera Key was always created when generating a Plane + a Camera. In Odyssey 2.1, this is no longer the case.
Create a camera key
If you want to make a camera move, you will have to start with the first camera key. The method will depend on the view mode.
From the Board View
To create a camera key, scrub in the Sequencer to the moment you want the camera move to start. Then hover the Shot Sequence and click on the icon with a camera to generate a camera key.
From the Shot View
To create a camera key, scrub in the Sequencer to the moment you want the camera move to start. Then click on the tiny + in a diamond in the Track “Transform” under the Track “Camera_[number]”.
Once a key has been created, you can then make the camera move. There are several possibile configurations to do so.
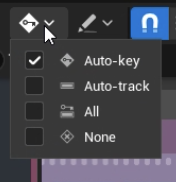
Key mode
By default, the key mode “Auto-key” is enabled and can be modified here, in the Sequencer’s Toolbar:
Key mode |
Description |
Pros |
Cons |
|---|---|---|---|
Auto-key |
Any change made with the Camera Actor from the Viewport or from the Sequencer will generate automatically a new Key. |
It’s easy and you are sure that any changes will be remembered |
You might add camera keys by mistake a lot, especially when piloting the camera. |
None |
You must create a key manually after changing any attributes from the Camera Actor in the Viewport. |
It will prevent the creation of wrong keys, like moving a piloted camera by mistake. |
Will reset the position of the camera if you forgot to add a key manually. |
Tip
What key mode should I use?
When creating camera moves, do use the Auto-key mode. When drawing, use the None mode or Lock Viewport to Boards.

Making the camera move
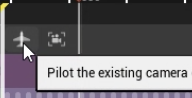
While piloting the camera
As explained in this lesson, by default you will be piloting the Camera Actor created along with the Plane Actor. If you disabled it, you can re-activate it like this:
Board View |
|
Shot View |

|
If the key mode Auto-key is on, piloting and moving the Camera Actor will automatically add a new key.
If the key mode is None, piloting and moving the Camera Actor implies that you hit the camera icon to save the new position:
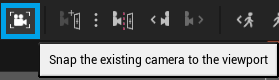
In the Shot View, this icon can be found in the tool bar
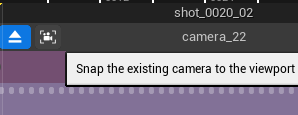
In the Board View, this icon can be found by hovering the Shot Sequence
Without piloting the camera
Camera can also be manipulated without piloting it. To do so:
Eject the Camera Pilot mode.

You can also click on the icon “Eject” from the Board View or the icon “Camera” from the Shot View.
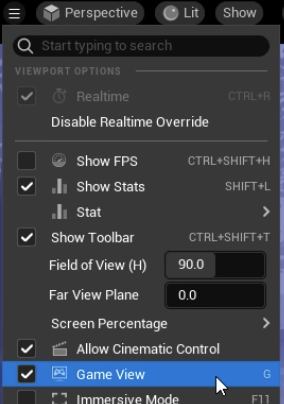
Disable the Game View mode from the Viewport (or hit the shortcut G) to display the Camera Actor’s mesh.
Move the Camera Actor using the guizmo.
Of course, if the key mode is set to None, make sure you add the key manually.
Flip between camera keys
To flip between Camera key position, you can use these icons in the Sequencer Toolbar:

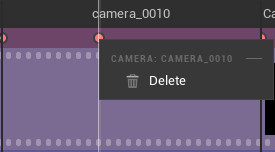
Delete camera key
If you created a Key by mistake, do a right click on the key to delete it.
Board View |
|
Shot View |

|
Change the interpolation type
In the Shot View, you can change the nature of the interpolation with a right click on the key.
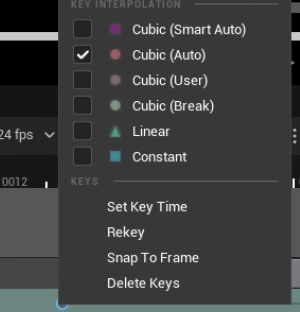
For more details, please read this guide from Unreal Engine.
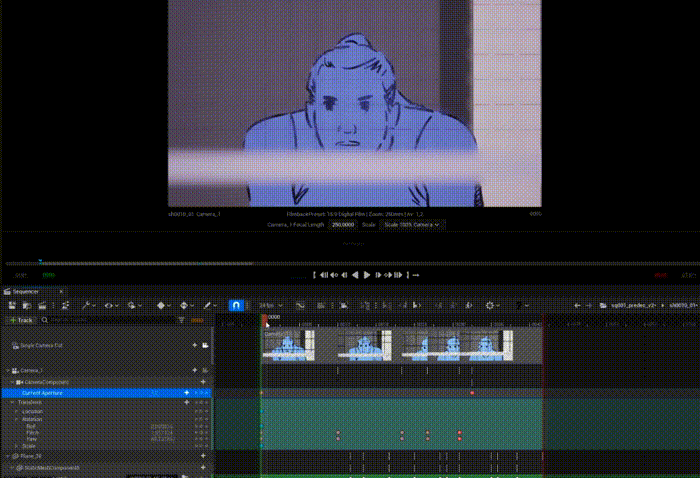
Camera Settings Changes
In the section Settings ▸ Camera Settings, we saw how to change the Camera Settings. In this lesson, we will see how to create Keys in the Shot View to affect the Camera.
Open the panel Details
Double click on a Shot to open the Shot View
Select the Camera in the Shot
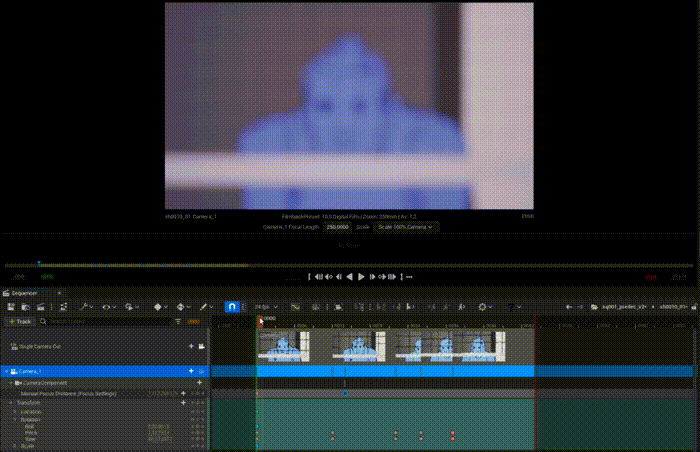
In the Detail panel, you will see the usual Camera settings (Lens, Focus, Focal Length, Aperture, etc). Click on this icon to add a setting Track in the Camera Track and a Key.
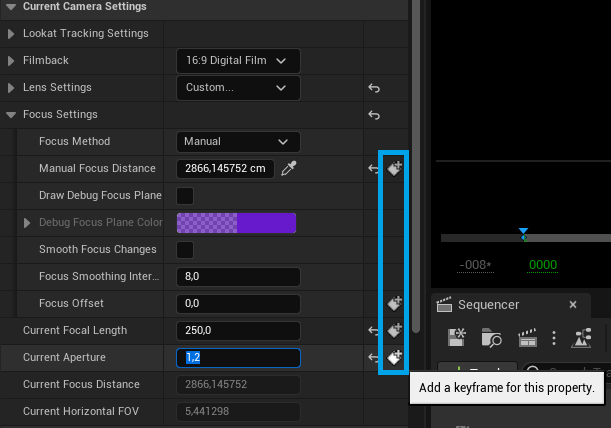
In this example, we will be playing here with the parameter Current Aperture with a value of 1.2. If we move the cursor further in the Sequencer with the option Auto-key enable, any change made either in the Details panel or directly in the Track Current Aperture will automatically add a key.
We can also play with the focus instead.
Note
You can complete your knowledge about camera settings in the lesson about the basics of Level Sequences.